Showing posts with label Quilt. Show all posts

Friday, July 05, 2013

Santa Quilt

My mom saw this pattern in a quilt shop, and admired it, so of course, I wanted to make one for her for Christmas.. It's called "Nine Nicks" by Qwiltz Patterns.

I started cutting out the pieces and realized I wanted to make two - one for me to keep! The curves were a little tricky, but after watching  a few times, I got the hang of it. That was a really helpful youtube BTW.

lasob small

 I wanted to make the Santas of different colors, since we have varying colors of Santas in our family..
Photobucket

I used the traditional reds and greens for my Mom's quilt, and choose some snazzy, glittery blues for mine.

Photobucket

Photobucket

Here's mom's quilt all finished ( and I did get it done in time for her to hang before her Christmas Party!)

Photobucket

Mine is still waiting to be completely put together.. I don't think of it as late, just extra early for next Christmas.

Sunday, September 05, 2010

Kaleidoscope Quilt

Or Stack n Whack, One Block Wonder. I've seen a few names for this sort of quilt. You start with a loud patterned fabric  with repeats every 23 inches or so.
Photobucket
You make cuts of the fabric, stack up the sections, and cut out 8  identical triangles.

Photobucket

Then you sew  the triangles together and watch all the different patterns pop out like magic:

Photobucket

I tried making some 4 triangle squares, just to see what it would look like:

Photobucket


and here's all the blocks I made from that one piece of fabric:

Photobucket

Saturday, August 15, 2009

Paper doll Quilt

I love this fabric! Snippets By American Jane for Moda. It's so sweet, paper dolls, and little dolly clothes! It was the perfect choice for a friend's baby quilt:

Photobucket

Back of Quilt:
Photobucket

Photobucket

Saturday, July 25, 2009

It's all pieced!

Okay so I didn't get it all sewn together that day. I ran into a few problems- I had to re-piece two blocks that I somehow put together backwards. That and I had laundry screaming at me too. But It's done.
Photobucket

All I have to do now is send it off to my Quilter, Becky. Thank God for Becky! After becky works her magic on it, this quilt will go live with my mom, and have a special spot in the "grandkid's room" at her house.

Finishing this quilt meant a lot more to me than I thought. After I had the last seam sewn, I laid it out out on the floor to take a picture of it - and I cried.

Why so sappy over a quilt top? I don't usually cry over finishing one, I'm usually happy to have it done and out of my hair. But this one was more than just a sewing project. It was a huge mess that I had the chance to fix!

Here is what I started with I messed this up really bad, and it is one of those rare moments in life when you get a chance for a do over.


Most importantly, this quilt is proof that I finished a project! One thing I do not like about myself is that I had a habit of starting a lot of stuff but didn't always see it through. Heck, the main reason I started this blog was to motivate myself to finish up my UFO's! And look, it's working!

Wednesday, June 17, 2009

Stained Glass Quilt

Another UFO done! I know it wasn't on my list of UFOs but, well, I have a lot of UFOs laying around. This is my Mother's Christmas Present. Yes, I mean last Christmas. Yes, I know it is June. Technically it was all finished a few months ago ( but not before Christmas), but I decided to add a quilt label on the back.

I got the idea for this quilt from a church in Grayson County Virginia. My Mother does a lot of genealogy research, and tracked down a slew of our Ancestors in that county. There is a pretty little church there, with beautiful stained glass windows, and a few of the windows had our ancestors name's on them.
Stained glass Quilt

Stained  glss quilt

I started with a foundation fabric, and sketched out the lines of the pieces, and sewed blocks onto the foundation:
Stained glass quilt

Then I added bias tape for the leading:
Stained glass quilt


It was hard to quilt on my machine, and next time I will hire that part out. It was the first stained Glass project I've done, and I'd really like to do more. Overall I was pleased with it. And it's for my mother, so I'm sure she'll like it. Your mother has to like your artwork, it's some sort of rule.
Stained glass quilt

Saturday, June 13, 2009

UFO for the summer

I always have several projects going at once, and The very reason I blog is that I hope to push myself into actually finishing all the things I start. Here's the latest round of UFO's ( besides the feedsack quilt and the Rug below) but Hey, I did finish the Silk Tie dress, so that counts, right?

This dress is very comfy, and I wear it around the house because it just feels good on. But I really don't like the flowery print, and I want to make it a bit longer, so I thought I'd try to copy it in a bright happy loud tie dye fabric. I have the skirt cut out..
Tie dye dress copy

I saw a really cute Watermelon hat at my favorite kids clothing store, and thought I'd try to make one for Mollie. It's a small project, I keep it in my purse and take it along to the park and work on it while the kids play.
Crochet watermelon hat

I have been hanging onto some of My daughter's clothes to make into a little quilt. Most of the pieces are knit, and I thought the pieces and patterns would look cute in a charm quilt, with hexagons. I don't really sew a lot with knits, so this may very well be a disaster, but at least it will be a small disaster. I even cut some small squares for a matching Dolly quilt.
recycle clothes 1 Quilt

Sunday, May 17, 2009

Feedsack Quilt - Fresh Start!

I decided to use the Snail's trail pattern with the feedsack material I took apart. I set to work re-cutting the triangles:

Photobucket

And started piecing the blocks. I used a red from the Snippets line by Moda to contrast with the feedsack fabrics
Feedsack Progress

I am so pleased with how it looks this time around!


I have decided I like it so much I am going to make a second quilt for me to keep.

Sunday, May 10, 2009

Feedsack Quilt

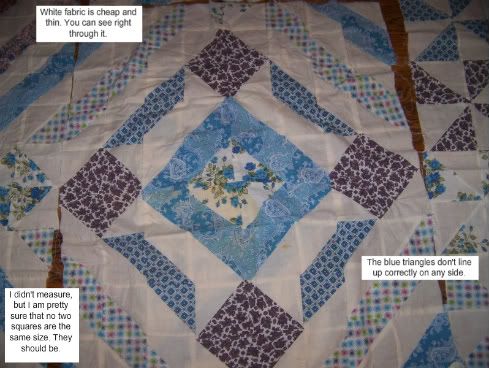
I started this quilt about 10 years ago, when I was very new to quilting.

I got it about halfway finished and stopped in frustration, packed it all in a box and hid it. For years it has been bothering me, and finally I did something about it. Or At least I started doing something about it..


Before:
Photobucket


And the back..This is when I learned all about how important seam allowance is:
Photobucket

This past week, I took a Seam Ripper to it and pulled every bit of it apart, and threw out the horrid white material I had used:
Photobucket

After several hours of picking seams and ironing, I now have a motley assortment of triangles. 10 years of this quilt mocking me, and I had the last laugh! Now to figure out what to actually do with them..

UPDATE!
Here's how the remake of this quilt is going

Update again!
The finished top

Saturday, April 18, 2009

Kameleon Quilt - two quilts in one

Here's an update on "Growing Season"..

Eldrid Royset Forde designed this Pattern. The name of the pattern is "Kameleon Quilt Night and Day". It can be found at her website Kameleon Quilt Tekstildesign


I love the idea of having a quilt that changes. Here's my completed version.
First the solids, which makes me think of the early days of spring, at planting time
Flippy Quilt

Then the harvest season, when the garden offers it's bounty
Flippy Quilt

Close up of the middle with solids showing
Flippy Quilt

And the middle with the corn and chickens showing

Flippy Quilt


The secret to getting two looks out of the quilt is the flaps that move back and forth and fasten onto a button in the center of the squares. The flaps have a different fabric on the back so when it is moved and buttoned in the opposite direction, you see the fabric underneath.
Flippy Quilt

Sunday, March 22, 2009

Moda Jelly Rolls

Oh My, are these ever delightful!
I purchased 4 jelly rolls of Moda's 5 Funky Monkeys Line, and made 3 quilts with the strip Quilting Method. These make up very quickly, since the fabric is already cut in strips:

Queen sized one for my Daughter:
Monkey 088

Photobucket

One Baby Quilt That my son helped sew for a friend of ours:
Photobucket

And yet another Baby quilt for a friend:
Photobucket

All Patterns are from the book Strip Happy...Quilting on a Roll.

Working with Solvy

Using Solvy for Applique can eliminate a lot of headaches: You can avoid hand turning under edges, do machine applique with neater results, and it works out pretty quickly, allowing you the time to do more elaborate Applique pieces.

Here's how I used it a on Halloween kitty Quilt. Solvy is a marvelous product that looks like clear plastic, usually comes in a roll - and best of all, Solvy dissolves in water, so it will wash away when you wash your quilt.

1. I used or a window to trace my pattern onto freezer paper. ( who needs a light box?) Cut one pattern apart and used the second for reference. If you have a lot of pieces you may want to number them .

Photobucket

Photobucket

2. Traced each pattern piece onto the wrong side of the fabric, and sewed the Solvy onto the back of the fabric, using a 1'4 inch seam allowance.
Photobucket

Photobucket

3. Cut a slit in the Solvy and turned pattern pieces right side out..

Photobucket

4. Arranged pieces on background, and pinned into place. I used a close zigzag (satin stitch) to sew around edges.

Photobucket

Learn more about Solvy here: http://www.sulky.com/stabilizers/solvy.php

Pattern used was from The Book Kitty Capers by Carol Armstrong

Thursday, January 15, 2009

Raggy Quilt Instructions

This is a great beginner project and great idea for gifts. They make up quickly and require little planning and the best part - you can hide a lot of mistakes. If seams get a little squiggly, and corners aren't perfect, the raggy edges disguise it well.

First decide how big you want your quilt. A nice kid size is is 35" square. For that you would want 5" finished squares. For a larger 64" square quilt you can use larger 8 " finished squares. Keep the math clean. This is not the time to fool around with decimals.

Graph paper is a good way to lay out color if you want a pattern. Denim and flannel work well for a raggy edge.


Cut flannel or denim into squares one inch bigger than you want the finished size to be. If you want 5 squares in your quilt, cut 6 inch squares.

If you have decided on 5" finished squares, cut 5" squares of batting. You want the batting 1" smaller than the size of the squares you cut, so you won't have batting sticking out of the fringed edges. This is a good time to use up scraps of batting from other projects. It would be fine to mix different colors or kinds of batting for this.

Now make sandwiches. Two squares of flannel, right sides out with a square of batting in between.
Photobucket

Now sew straight or curvy lines , or spirals onto each square. That is all the quilting you will do. You quilt it before you sew it together.
Photobucket

Sew squares together into rows. Use a 1/2 " seam to sew squares and rows together. For a larger quilt it may be easier to sew the rows into blocks, and then sew the blocks together:
Photobucket

Once your quilt is assembled - and it will surprise you how quickly it goes - Sew about 1/2 " around the outside of the quilt, to keep the edges from unraveling. Now it's time to clip it. Use a sharp pair of scissors and make little snips along all the edges of the squares, and all along the sides. This will make a huge mess.
Raggy 20077


the clipping takes the longest on this quilt. Plan to watch a movie or two while you clip edges. Once you have the edges all clipped, take the quilt outside, and shake the bejeezus out of it. This should get a lot of the little loose thread out, and start the nice raggy edge.

Toss it in the dryer for a cycle, and then clean the lint trap of your dryer. Really, it's a LOT of lint Then throw it in the wash, and dry again.

Now enjoy. Use it for picnics, playing on the floor. This isn't a quilt to store away. The more it's used and washed, the nicer the flannel feels, and the edges look.

Photobucket

Photobucket

Quilting Rules to Break part one: Size really doesn't matter

If you spend any time with a group of quilters, you'll hear the "rules" . When you are just starting out you google, you ask the professionals, you turn to the blue ribbon winners for advice and you will hear : Things You Must Follow To Be A Real Quilter.

At the risk of being tsk'd tsk'd, I say take the rules, see if they work, and if they don't, toss 'em. nobody will take your rotary cutter away, I promise.

1. Full size, Queen, Twin?
There is the assumption that when making a quilt, it must go on a bed. It must drape nicely over the sides and allow for pillows.

Pfooey on that. Maybe I want a quilt to snuggle on the couch and it needs to be just long enough for your favorite couch potato's toes to be covered and wide enough to accommodate two kids and a few small animals. ( He requested that it be exactly this size. On a side note, It's hard to measure around cats. They keep grabbing the tape)
Photobucket


Or maybe I don't even want it to be a rectangle at all. How about a hexagon shape meant to lay on the floor for baby to crawl on ?
Photobucket

You can make any size or shape you want, from teensy dollhouse size to great ginormous museum pieces. Make it round, or square, practically sized for the bed if you like , or absolutely impractical polygonish and enjoy the quirkiness of it.